Transform Your Classroom into a Learning Powerhouse with Learning Stations
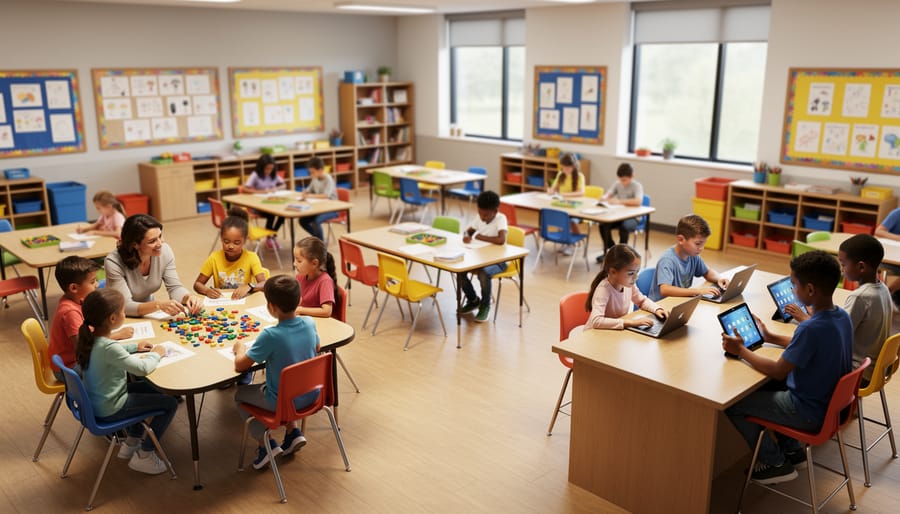
Transform your classroom into a dynamic learning environment by dividing students into small groups that rotate through different activity areas. Set up 4-6 distinct stations around your room, each focused on a specific skill or topic, allowing students to practice concepts through hands-on engagement while you provide targeted support to individual groups.
Start with clearly defined station purposes: create one area for independent practice, another for collaborative problem-solving, a technology station for digital activities, and a teacher-led station where you work directly with small groups. Label each station with simple instructions and all necessary materials within arm’s reach so students can transition smoothly without constant direction.
Establish a rotation system using timers set for 10-15 minute intervals, training students to move clockwise to their next station when they hear the signal. This structure keeps energy high and prevents the restlessness that comes from sitting too long in one spot.
Keep management simple by assigning station monitors, posting visual schedules, and practicing transitions during the first week. The initial investment in teaching procedures pays off quickly as students gain independence, freeing you to focus on meaningful instruction rather than crowd control. Station-based learning turns your classroom into multiple learning hubs working simultaneously, maximizing every minute of your teaching day.
What Are Classroom Stations and Why Teachers Love Them
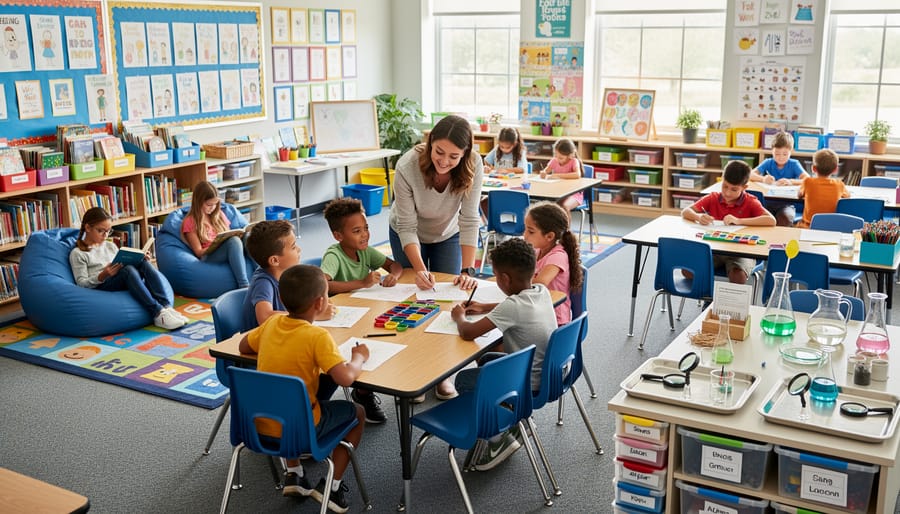
Imagine transforming your classroom from rows of desks into dynamic learning zones where students actively explore, practice, and master skills at their own pace. That’s exactly what classroom stations do! Learning stations are designated areas in your classroom where students rotate through different activities, each focusing on specific skills or concepts. Think of them as mini learning hubs that keep everyone engaged and moving.
Unlike traditional whole-group instruction where you’re teaching the same content to everyone simultaneously, stations allow multiple learning experiences to happen at once. While you’re working with a small group on reading comprehension, other students might be practicing math facts at another station, conducting a science experiment, or collaborating on a writing project. It’s like having several classrooms operating within one room!
Teachers absolutely love stations for good reasons. First, they make differentiation so much easier. You can tailor activities to meet diverse learning needs without singling anyone out. Your advanced learners get challenged while struggling students receive appropriate support, all happening naturally through station design.
Second, stations promote student autonomy. Kids learn to manage their time, follow directions independently, and take ownership of their learning journey. This builds confidence and essential life skills beyond academics.
Third, stations give you incredible flexibility. While students work independently or in small groups, you gain precious time for targeted instruction, observations, or one-on-one conferences. You’re not constantly performing for the entire class, which honestly feels refreshing!
Plus, let’s be real: stations inject fun and variety into your day. Students stay motivated when learning feels like an adventure rather than sitting still for hours. The movement, choice, and hands-on experiences create an energized classroom atmosphere everyone enjoys.
Stations vs. Centers: What’s the Real Difference?
You’ve probably heard both terms tossed around in teacher circles, and honestly, the line between stations and centers can feel pretty blurry! Here’s the simple breakdown: stations typically involve structured, timed rotations where all students move through specific activities in a set order. Think of it like a circuit – everyone gets the same experience, just at different times.
Centers, on the other hand, are usually more flexible and choice-driven. Students might select which center to visit based on their interests or needs, and there’s often no strict timeline for rotation. They’re more of a “pick your own adventure” approach to learning.
So which one should you use? It really depends on your goals and classroom vibe! Stations work beautifully when you want to ensure every student experiences particular content or skills. They’re fantastic for introducing new concepts or when you need tighter control over pacing and accountability.
Centers shine when you’re ready to offer more student autonomy and differentiation. They’re perfect for practice time, enrichment activities, or when students are working at different levels.
Here’s the good news – you don’t have to pick just one! Many teachers blend both approaches, using structured stations for core content and open centers for extension work. The key is choosing what fits your teaching style and meets your students where they are. Start with what feels manageable, then customize as you go!
Setting Up Your First Station Rotation
Choose Your Station Activities
The key to successful stations is choosing activities that work together to reinforce your learning goals while keeping students engaged. Aim for 4-6 stations that offer variety and cater to different learning styles.
Start with your lesson objective and think about how you can break it into smaller, focused tasks. Mix up your station types to keep things fresh and exciting. Include an independent work station where students practice skills on their own, like completing worksheets or reading passages. Add a collaborative station where students work in pairs or small groups on projects or problem-solving activities.
Technology stations are always popular with students. These can include educational games, interactive apps, or online research activities. Balance screen time with hands-on learning stations featuring manipulatives, art projects, or science experiments that let students explore concepts through doing.
Don’t forget to include a teacher-led station where you provide direct instruction or targeted support to small groups. This gives you valuable face time with each student while others work independently.
The beauty of stations is customization. Choose activities that fit your classroom resources, student needs, and teaching style. What works for your colleague might not work for you, and that’s perfectly okay. Start with what feels manageable and build from there.
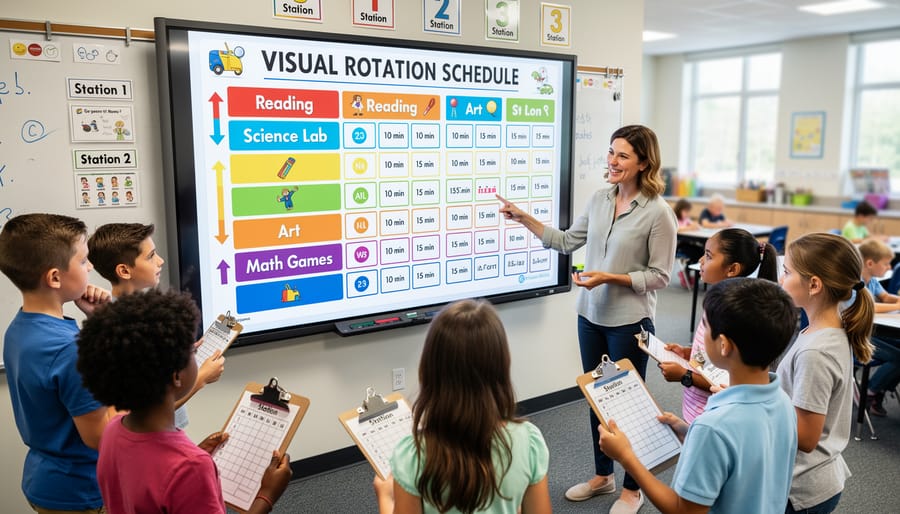
Create Your Rotation Schedule
Getting your rotation schedule just right makes all the difference in keeping students engaged and your classroom running smoothly! Start by timing each station between 10-20 minutes, depending on your grade level and the complexity of activities. Younger students often do better with shorter 10-12 minute rotations, while older learners can handle 15-20 minutes without losing focus.
Create a simple visual schedule that everyone can see and understand. Use a colorful chart, slide presentation, or even a poster with pictures representing each station. This helps students know where they’re headed next and reduces those “What do I do now?” questions. You might display a digital timer on your board so everyone can track time together.
Now, decide on your rotation style. Simultaneous rotations mean all groups switch at the same time, which works great for structured classrooms and makes timing straightforward. Staggered starts let groups begin at different times, which can reduce crowding and noise during transitions. Try both approaches and see what feels right for your teaching style!
Remember, your schedule isn’t set in stone. Feel free to adjust timing based on how engaged students are or how complex the activities turn out to be. The goal is creating a rhythm that works for you and your learners.
Establish Clear Expectations and Routines
Setting up your stations is just the beginning—now let’s make sure they run smoothly! Clear expectations and routines are your secret weapons for successful station rotations.
Start by teaching transition signals that work for your classroom. Whether it’s a chime, a specific song, or a hand clap pattern, choose something that grabs attention without creating chaos. Practice these signals repeatedly during the first week, making it fun by timing how quickly students can move between stations.
Voice level expectations are crucial when multiple activities happen simultaneously. Create a simple visual chart showing different voice levels: silent for independent reading, whisper voices for partner work, and small group voices for collaborative stations. Post these at each station so students have constant reminders.
Here’s a game-changer: establish a “ask three before me” rule. Students must check instructions, ask a station buddy, or review posted examples before seeking teacher help. This keeps you free to facilitate learning rather than answering the same questions repeatedly.
What about students who finish early? Set up extension activities right at the station—think challenge questions, creative extensions, or bonus games. You can also designate a “when you’re done” bin with engaging review games or puzzles that reinforce skills.
Consider creating a station expectations anchor chart together with your class. When students help establish the rules, they’re more invested in following them. Make it colorful, post it prominently, and reference it often during those first few weeks!
Station Ideas That Actually Work
Teacher Table Station
The teacher table is your command center for targeted instruction! This is where you work with small groups while the rest of your class stays engaged at their stations. Use this time for mini-lessons, guided reading, quick assessments, or providing extra support to students who need it. Keep materials organized and ready to go so transitions are smooth. The beauty of the teacher table is that you can customize your focus daily based on student needs. Maybe Mondays are for math intervention, while Wednesdays you introduce new concepts to advanced learners. Keep sessions short and purposeful, around 10-15 minutes per group, so you can rotate through multiple students during station time.
Game-Based Review Station
Game-based review stations transform practice time into something students actually look forward to! Set up a station where learners can independently play review games that reinforce key concepts you’ve already taught. PowerPoint games like Jeopardy or Who Wants to Be a Millionaire work wonderfully and can be customized to match any subject or skill level. Simply load the game on a classroom device and let student pairs or small groups take turns answering questions.
Don’t overlook the power of classic board games and card games either. Create custom question cards that students draw during their turn, or adapt existing games by replacing traditional game cards with review content. The competitive element keeps engagement high while the repetitive practice solidifies learning without feeling like drill work.
The beauty of game-based stations is that they practically run themselves. Once you’ve explained the rules and loaded the materials, students can manage their own gameplay, freeing you to work with other groups or facilitate different stations across the room.
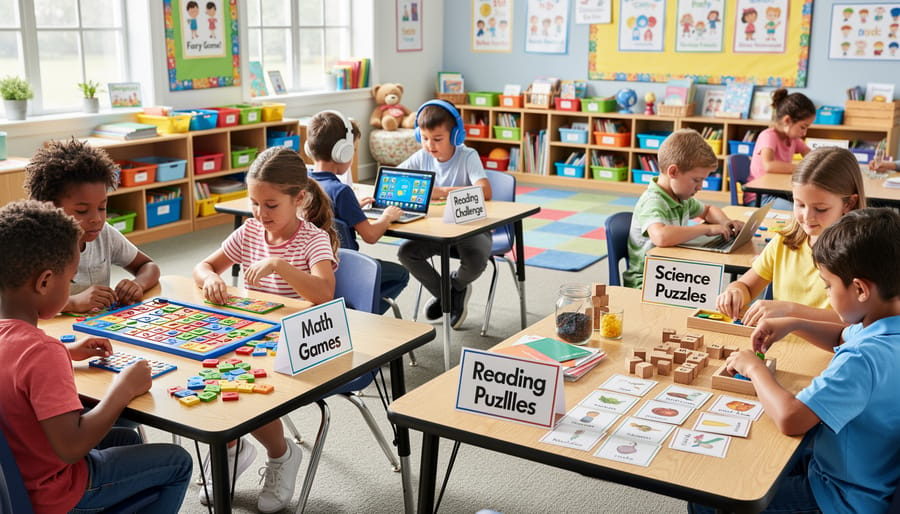
Independent Practice Station
Independent practice stations give students the freedom to work through activities at their own speed while reinforcing new concepts. Set up engaging worksheets, task cards, or digital practice tools that match different skill levels. This is your chance to personalize learning! Include answer keys for self-checking to build confidence and independence. Mix in game-based worksheets or interactive online activities to keep energy high. For advanced learners, add extension options like challenge problems or creative applications. Rotate materials regularly to maintain student interest and excitement at this station.
Collaborative Project Station
Bring students together with collaborative project stations that make teamwork exciting and productive! Set up partner or small group challenges like building puzzles, solving mystery scenarios, or creating collaborative art projects. These stations work beautifully for science experiments, math problem-solving races, or design challenges where students must work together to reach a goal. Keep groups small (2-4 students) to ensure everyone participates actively. Provide clear instructions and all necessary materials at each station so groups can work independently. Consider rotating roles within teams—like materials manager, timekeeper, or presenter—to give everyone a chance to lead. The magic happens when students learn to communicate, share ideas, and celebrate their combined successes!
Technology Station
Welcome to one of the most exciting spots in your classroom! Your Technology Station brings learning to life through computers, tablets, or Chromebooks loaded with educational apps and digital tools. Students can explore math concepts with virtual manipulatives, practice literacy skills through interactive games, or unleash their creativity with digital drawing and storytelling programs. The beauty of this station is its flexibility—you can customize activities to match any subject or skill level. Rotate different apps weekly to keep things fresh and engaging, or let students choose from a curated selection. Don’t forget to establish clear headphone rules and screen time limits to keep everything running smoothly!
Making Stations Run Smoothly (Without Losing Your Mind)
Keep Noise Levels Under Control
Let’s face it—stations can get loud! But with a few simple strategies, you can keep the energy productive without the chaos. Start by creating a voice level chart with fun, visual cues. Try a 0-5 scale where 0 is silent and 3 is “station talk.” Display it prominently so students can self-monitor their volume.
Establish quiet signals that work for you—flicking the lights, raising your hand, or using a chime. Practice these signals during your first station rotations so they become second nature. The key is consistency!
Think strategically about placement too. Position your noisier, collaborative stations away from quiet reading or independent work areas. If possible, spread high-energy stations across the room rather than clustering them together.
Create a “volume monitor” role at each station. Students love having jobs, and this empowers them to help manage noise levels. You can even turn it into a friendly challenge—which station can maintain the perfect volume today?
Remember, some buzz is actually wonderful! It means students are engaged and collaborating. Your goal isn’t silence—it’s purposeful, productive learning energy that keeps everyone focused and happy.
Handle Different Pacing
Different students work at different speeds, and that’s perfectly okay! The key is planning ahead so everyone stays productive and engaged. Build fast finisher activities directly into your stations. These can be extension challenges, brain teasers, or bonus questions that deepen understanding without creating extra work for you.
Create a “challenge corner” at each station with optional activities for speedy workers. You might include puzzles, creative drawing prompts, or review games they can play independently. Another great strategy is designating one station as a flexible enrichment area where students can explore topics more deeply.
For students who need more time, consider making certain stations shorter or providing sentence starters and visual aids. The beauty of stations is that you can customize each one to keep everyone engaged at their own level. Mix required tasks with choice activities so students feel accomplished regardless of their pace.
Track Student Progress
Keeping tabs on student progress doesn’t have to mean drowning in paperwork! Start with simple station logs where students initial or check off completed activities. You can create a large poster chart or use individual tracking sheets tucked into folders at each station.
Quick checks work wonders too. Spend just two minutes observing each station during rotations, looking for engagement and understanding. Keep a clipboard handy to jot quick notes about who might need extra support or who’s ready for a challenge.
Self-assessment strategies put students in the driver’s seat of their own learning. Try adding reflection prompts at stations like “What was tricky today?” or “Rate your confidence: 1-5 stars.” Sticky notes work great for quick responses you can review later without creating stacks of papers.
Digital options can streamline tracking even more. Simple Google Forms or classroom apps let students log their progress with a few taps. The key is choosing one or two methods that feel manageable for you and your students. Remember, the goal is gathering useful information to guide your teaching, not creating extra busywork. Start small, see what works, and adjust as you go!
Customizing Stations for Your Unique Classroom
Here’s the wonderful truth about classroom stations: they’re incredibly flexible and totally yours to design! There’s no magic formula that works for every classroom, and that’s actually what makes stations so powerful.
If you’re working with younger students, keep your stations simple with clear visuals and fewer steps. Kindergarten stations might focus on hands-on exploration with manipulatives, while fifth-grade stations can handle more complex, multi-step activities. The key is meeting your students where they are developmentally.
Class size doesn’t have to limit you either. Small classes can rotate through 3-4 stations, while larger groups might benefit from 5-6 stations with duplicate activities. Don’t hesitate to create two identical stations if you have 30 students but limited space. It keeps group sizes manageable and engagement high.
Your classroom layout matters, but it shouldn’t stop you. No extra tables? Use clipboards for floor stations, hang activities on walls, or transform a corner with a rug into a cozy reading station. Tight on space? Consider digital stations on tablets or create standing stations at counters.
Subject areas open up endless possibilities too. Math stations can include puzzle games and problem-solving challenges. Reading stations might feature partner reading, vocabulary games, or comprehension activities. Science stations work beautifully for experiments and observations, while social studies stations can incorporate map work and primary source analysis.
The best part? You can start small. Begin with just two stations during one subject period, see what works, and build from there. Observe how your students respond, adjust the timing, and swap activities that don’t click. Your stations should evolve with your classroom’s unique rhythm and your teaching style. Trust your instincts and have fun experimenting!
If you’re feeling a bit overwhelmed right now, take a deep breath. Here’s the truth: stations get easier with practice. Your first attempt might feel a little chaotic, and that’s completely normal. Each time you run stations, you’ll discover what works best for your unique classroom and students.
The best advice? Start small. Begin with just 2-3 stations instead of trying to manage five or six right away. This gives you and your students a chance to learn the routines without feeling stressed. Once everyone feels comfortable with the flow, you can gradually add more stations and increase complexity.
Remember why you’re doing this. When you embrace student-centered learning through stations, you’re creating opportunities for students to take ownership of their education. You’ll see increased engagement, hear more excited conversations about learning, and watch achievement grow as students work at their own pace and learning style.
Every small step you take toward making your classroom more interactive makes a real difference in your students’ lives. You’ve got this, and your students are lucky to have a teacher willing to try something new for their benefit.